How To Use Screen Mirroring
Preparing the Projector for Screen Mirroring
Press the ‘Input Source’ button on either the projector or the remote to enter input selection. Then select the CAST option.
On the projector, select CAST for to enter screen mirroring mode.


On the CAST screen the LumaVision Pro is ready for a device to connect. If you area trying to mirror an iOS device, you need to connect the projector and the device to the same WiFI network. To connect the LumaVision Pro to a WiFi network:
- While on the CAST screen, press the OK button on the remote to enter the network system settings.
- Highlight WiFi setting and press OK with the remote
- After the projector searches for available WiFI networks, select the desired WiFi network and press OK.
- Enter the WiFI network’s password and press OK.
- If successful, keep pressing the BACK button on the remote until you return to the CAST screen.
There is no WiFi network available in at your location you can connect to your device to the projector’s default WiFi network. The network’s name will be in the format ‘LumaVision Pro-XX’ and the default password will be ‘12345678’. The current network name and password are displayed on the top of the CAST screen. Please note that your device would need to use it’s own cellular connection to access the internet.
Screen Mirroring with Miracast (Android)
NOTE:
Please be aware that not all Android smartphones support Miracast. As of Android version 6.0 Miracast is no longer supported by default. However, most smartphone manufacturers have provided support for Miracast in their devices. For example, Samsung provided Miracast under the feature ‘Smart View’, Please see your smartphone’s documentation for the exact details on how to enable and use Miracast.
To start screen mirroring:
- Ensure your Android device’s WiFI connection is on and the LumaVision Pro is on the CAST input. Please note that depending on the manufacturer the LumaVision Pro does not need to be connected to the same WiFI network as the Android device. However, it is still recommended.
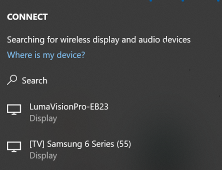
- Find and open your device’s miracast feature. You may need to first enable this feature in settings. Some example names include: Smart View, Screen Share, Smart Share (LG), Wireless Display (aka WiDi), Display Mirroring, HTC Connect and Wi-Fi Direct. For Samsung Smart View, the option can be found in the quick settings panel:Your device should now search for the LumaVision Pro. Select ‘LumaVision Pro - XX’ when it appears.

-
Your android device will start screen mirroring. Please note that audio is note streamed to the LumaVision Pro and will continue to play on your Android device. For a better audio experience, you can use a Bluetooth speaker connected to your Android device.
Screen Mirroring (Android) Through USB Connection
NOTE:
Please use the original cable provided with your device. Third party cables may not work.
Not all Android devices support screen mirroring over a USB connection.
To screen mirror over a USB connection on your Android device Developer Mode and USB debugging need to be enabled. The steps to enable Developer mode and USB debugging will depend on the device, but a common process is the following:
- Open Settings on your Android device, and select ‘About phone’.
- Scroll to the bottom of the ‘About phone’ page and tap on ’Build number’ repeatedly until your device tells you that developer mode has been turned on.
- Locate and select Developer options in settings. A common location is in the System submenu.
- Locate and enable USB debugging.
To being screen mirroring:
- Plug your Android device with the appropriate USB cable to the USB-T port on the LumaVision Pro.
- Select OK on the ‘Allow USB debugging’ pop up that appears on your Android device.
- Your Android device will now mirror it’s screen to the LumaVision Pro.

If you run into any issues while screen mirroring over a USB connection, please unplug your Android device and plug it back in. If the problem continues, please restart the projector.
Screen Mirroring (iOS)
To screen mirror with an iOS device, please make sure that your device and the projector are on the same WiFi network. They can both be on the same WiFi network, or if there is no WiFi network for the projector to connect to you can connect your device to the projector’s default WiFi network.
Please note that while using the projector’s WiFi your device will need to use cellular data to connect to the internet, and performance will be limited. If possible, connect both your device and the projector to a shared WiFi network.
To start screen mirroring have the projector on the CAST input and open up the control center on your iOS device. To open the control center:
- On an iPhone with Face ID: Swipe down from the top-right edge.
- On an iPhone with a Home button: Swipe up from the bottom.
With the control center open, tap on the Screen mirroring icon to being searching for the LumaVision Pro. Once found, tap on the LumaVision Pro to begin connecting to the projector. Once successful, your iOS device’s screen will now be mirror on the projector.

Screen Mirroring (iOS) Through USB Connection
NOTE:
Please use the original cable provided with your device. Third party cables may not work.
While on the CAST screen:
- Plug your iOS device with the appropriate USB cable to the USB-T port on the LumaVision Pro.
- Select Trust on the ‘Trust This Computer?” pop up that appears on your iOS device.

- Your iOS device will now mirror it’s screen to the LumaVision Pro.
If you run into any issues while screen mirroring over a USB connection, please unplug your iOS device and plug it back in. If the problem continues, please restart the projector.
Wireless Screen Mirroring Windows 10/11
Please note that your Windows device needs to support Miracast to be able to use this feature. Please see your computer’s documentation to verify that Miracast is supported.
To start screen mirroring:
- Ensure your computers WiFI connection is on. Please note that LumaVision Pro does not need to be connected to the same WiFI network as the computer.
- Press Windows Key + K to search for the LumaVision Pro as a wireless display. Once found, click on the projectors name to connect. If successful, your computer will now display on the projector.

- If you want to change the display option, press Windows Key + P to open the project options. Here you can select if you want to duplicate, extend (treat the projector as a second screen), or only display on the projector’s screen.


Troubleshooting and FAQ
My device is failing to connect to the LumaVision pro or playback is not smooth.
- Screen mirroring requires a strong WiFi connection. To improve the WiFi connection, try moving your device closer to the LumaVision Pro. If the problem persists, reset the projector’s screen mirroring module by pressing OK while on the CAST screen and selecting ‘Reset screen mirroring module’, and selecting ‘Confirm’. The module will reset back to the factory default. Please note you will need to connect the LumaVision Pro to a WiFi network again if required.
A black screen is displayed when trying to stream video in certain apps when screen mirroring an Android device.
- Copyrighted material cannot be streamed using Miracast. This includes streaming services such as Netflix, Amazon Prime Video, Hulu, and other similar services. Please note that this is a restriction of the Miracast standard and not of this projector. All projectors using Miracast will have this same restriction. You can play these services by using a HDMI connection. If your device cannot connect via HDMI, consider using a streaming device such as a Google Chromecast, Amazon Fire TV stick, or a Roku Streaming Stick.
My Android device supports Miracast, but I cannot find the Miracast option on my phone or the LumaVision Pro is not found when searching.
- Check the instructions provided your device’s manufacturer and make sure that the Miracast feature is fully enabled. Some devices will only mirror using Chromecast by default.
My Android device does not support Miracast.
- Consider using a streaming device such as a Google Chromecast, Amazon Fire TV stick, or a Roku Streaming Stick. If you only need to stream content stored on your device and not mirror the entire screen, check to see if a media app on your phone supports DLNA. If you do, you can cast content to the projector using DLNA. As the method of casting content will depend on the app, please check the app’s instructions.
The WiFi network’s password is difficult to enter using the remote.
- You can configure the Streaming Module using a web browser on your device. Connect to your device to the projector’s default WiFi network. The network’s name will be in the format ‘LumaVision Pro-XX’ and the default password will be ‘12345678’. The current network name and password are displayed on the top of the CAST screen. Once connected, type the IP address listed on the top of the CAST screen into the address bar of the web browser on your device. Click on WiFi AP, then Scan Ap. The LumaVision Pro will scan for available access points. Select the desired AP, enter the password and click connect.